Strawberry Cheesecake Jar – The Dessert That Instantly Became Everyone’s Favorite
Creamy, sweet, and packed with crisp biscuits and fresh strawberries, these Strawberry Cheesecake Jars are the ideal no-bake treat. Everyone remarked they tasted even better than bakery cheesecake after I made them for a family meal.
Since then, they’ve grown to be my go-to simple comfort dessert for get-togethers, festivities, and warm family get-togethers that involve shared sweet treats and laughing.
Why You’ll Love These Strawberry Cheesecake Jars
These little dessert jars became a favorite in my kitchen because they are:
- Creamy, rich, and refreshing
- No-bake and super easy
- Perfect for parties or gatherings
- Beautifully layered and café-style
- Easy to prepare ahead of time
- Loved by kids and adults equally
I personally love desserts that look impressive but secretly require very little effort — and this recipe absolutely does that.
Ingredients You’ll Need
For the Biscuit Base
- 1½ cups crushed digestive biscuits or graham crackers
- 4 tablespoons melted butter
For the Cheesecake Filling
- 1½ cups cream cheese
- 1 cup whipped cream
- ½ cup powdered sugar
- 1 teaspoon vanilla extract
For the Strawberry Layer
- 1½ cups fresh strawberries (chopped)
- 2 tablespoons sugar
- 1 teaspoon lemon juice
Optional Toppings
- Whipped cream
- Fresh strawberry slices
- Crushed biscuits
- White chocolate shavings
- Mint leaves
Why This Recipe Feels So Special
The thing I love most about these cheesecake jars is how they feel both homemade and elegant at the same time.
The buttery biscuit layer, creamy cheesecake filling, and sweet strawberry topping create the perfect balance of textures and flavors.
And honestly, every spoonful tastes like a mix between strawberry ice cream and rich cheesecake.
The first time I chilled them overnight and opened the fridge the next day, they looked so pretty lined up together that I almost didn’t want to eat them.
Almost.
Step-by-Step Strawberry Cheesecake Jar Recipe
Step 1: Prepare the Biscuit Base
Crush the biscuits into fine crumbs using:
- A food processor
- A rolling pin
- Or simply a sealed bag
Mix the crumbs with melted butter until the texture feels like wet sand.
Spoon the mixture into the bottom of each jar and press gently.
This buttery biscuit layer honestly smells incredible even before the dessert is assembled.
Step 2: Make the Strawberry Topping
In a small pan, combine:
- Chopped strawberries
- Sugar
- Lemon juice
Cook for 5–7 minutes until the strawberries soften and become slightly syrupy.
Let the mixture cool completely.
Sometimes I leave a few strawberry chunks larger because I love the homemade texture.
Step 3: Prepare the Cheesecake Filling
In a large bowl, beat:
- Cream cheese
- Powdered sugar
- Vanilla extract
Mix until smooth and creamy.
Fold in whipped cream gently until light and fluffy.
At this stage, I always sneak a spoonful because the filling tastes unbelievably creamy.
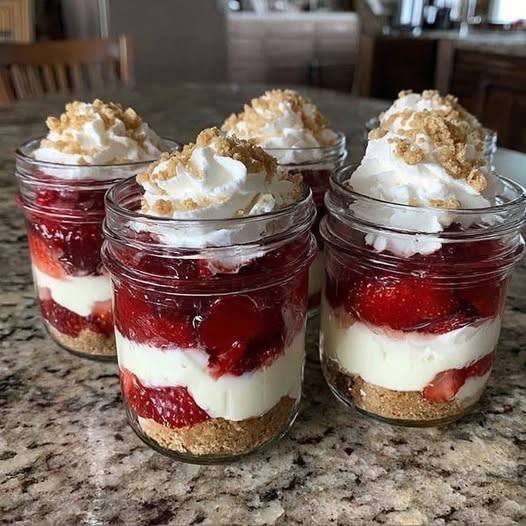
Step 4: Layer the Dessert Jars
Now comes the fun part.
Layer in this order:
- Biscuit base
- Cheesecake filling
- Strawberry topping
Repeat layers if your jars are tall enough.
Watching the layers build up honestly makes these desserts feel so fancy and satisfying.
Step 5: Chill Before Serving
Refrigerate for at least 2–4 hours.
Overnight is even better because the flavors blend beautifully.
The hardest part is waiting because they already look delicious immediately.
My Personal Tips for the Best Cheesecake Jars
After making these many times, here are my favorite tricks:
1. Use Cold Cream Cheese
It creates a smoother filling.
2. Chill the Jars Properly
Cold cheesecake tastes much richer and creamier.
3. Don’t Overmix the Whipped Cream
Gentle folding keeps the texture light.
4. Add Extra Strawberries on Top
Fresh fruit makes the jars look bakery-quality.
Sometimes I drizzle melted white chocolate on top during special occasions, and everyone absolutely loves that version.
Variations You Can Try
Chocolate Strawberry Cheesecake Jars
Add chocolate ganache layers.
Oreo Cheesecake Jars
Replace biscuits with crushed Oreos.
Mango Cheesecake Jars
Swap strawberries for mango puree.
Nutella Cheesecake Jars
Add Nutella swirls between layers.
Personally, the Oreo version disappears the fastest in my house.
Best Occasions for These Dessert Jars
These cheesecake jars are perfect for:
- Family dinners
- Birthday parties
- Eid gatherings
- Summer desserts
- Weekend treats
- Movie nights
- Tea parties
Last Sunday, we enjoyed these while watching a movie together, and somehow everyone went completely quiet during the first few bites.
That’s usually the biggest sign a dessert turned out really good.
Storage Tips
Refrigerator
Store covered for up to 4 days.
Freezer
Freeze without fresh toppings for up to 1 month.
I honestly love making them a day earlier because they taste even better the next day.
Nutritional Information (Per Jar)
| Nutrient | Amount |
|---|---|
| Calories | 320 kcal |
| Carbohydrates | 28 g |
| Protein | 5 g |
| Fat | 21 g |
| Saturated Fat | 12 g |
| Sugar | 18 g |
| Fiber | 2 g |
| Sodium | 180 mg |
| Calcium | 8% DV |
| Vitamin C | 20% DV |
Frequently Asked Questions
Can I Use Frozen Strawberries?
Yes, but fresh strawberries give better flavor and texture.
Can I Make These Without Cream Cheese?
Mascarpone works beautifully too.
Can I Use Larger Dessert Cups?
Absolutely. You can make one large cheesecake trifle-style dessert too.