No-Knead Rosemary Cheese Bread: The Easy Homemade Bread That Smells Better Than Any Bakery
There’s something almost dangerous about baking fresh bread at home. The smell fills the entire kitchen, everyone suddenly appears asking when it’ll be ready, and waiting for it to cool becomes nearly impossible.
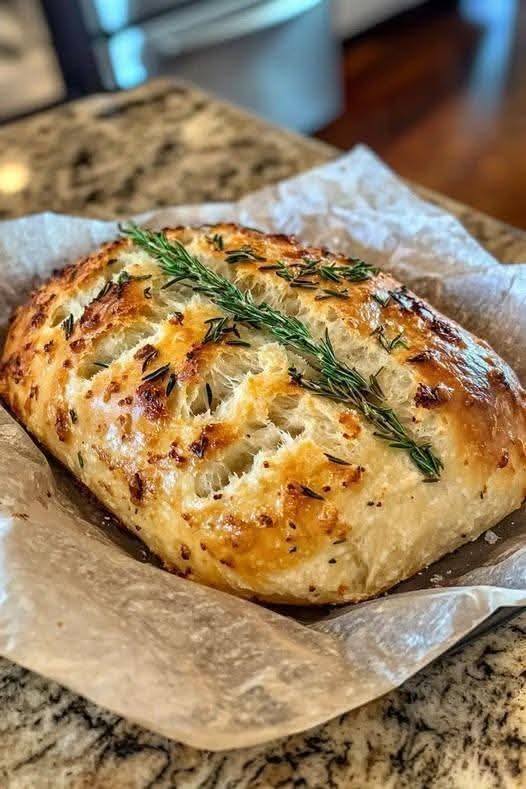
This no-knead rosemary cheese bread is exactly that kind of recipe.
It has a crispy golden crust, a soft airy center, pockets of melted cheese, and little bits of rosemary baked right into the top. And the best part? You don’t need fancy baking skills or complicated techniques to make it.
Honestly, the first time I made no-knead bread, I expected disaster. I thought homemade artisan bread required years of experience or one of those expensive stand mixers people proudly keep on their counters.
Turns out, it’s surprisingly forgiving.
The dough basically does most of the work for you while time handles the rest.
And once you pull that golden loaf out of the oven, you’ll understand why people become obsessed with homemade bread.
Why You’ll Love This Bread
No kneading required
Crispy bakery-style crust
Soft and chewy inside
Packed with rosemary and cheesy flavor
Beginner-friendly recipe
Perfect with soups, pasta, or butter
It tastes like something from an artisan bakery, but with way less effort than you’d expect.
Ingredients You’ll Need
3 cups all-purpose flour
1 1/2 teaspoons salt
1 teaspoon instant yeast
1 1/2 cups warm water
1 cup shredded mozzarella or cheddar cheese
1 tablespoon fresh rosemary, chopped
2 garlic cloves, minced
1 tablespoon olive oil
Optional toppings:
Extra rosemary
Parmesan cheese
Flaky sea salt
Black pepper
Step-by-Step Recipe
Step 1: Mix the Dough
In a large bowl, combine:
Flour
Salt
Yeast
Add warm water and mix with a spoon until a sticky dough forms.
Then mix in:
Cheese
Garlic
Rosemary
The dough will look messy and shaggy. That’s completely normal.
One thing beginners often worry about is the dough being too sticky. Resist the urge to keep adding flour. Sticky dough is actually what helps create those beautiful airy holes inside the bread.
Step 2: Let the Dough Rise
Cover the bowl with plastic wrap or a towel.
Leave it at room temperature for about 12–18 hours.
Yes, that sounds long, but this resting time is what creates the flavor and texture.
By morning or later in the day, the dough should look bubbly and doubled in size.
Honestly, this is why no-knead bread feels almost magical. You barely touch it, but it transforms completely on its own.
Step 3: Shape the Dough
Lightly flour your surface and gently place the dough onto it.
Fold the dough inward a few times to shape it into a rough ball.
Don’t overwork it.
This isn’t regular bread dough where you need perfect shaping. Rustic-looking bread actually adds to the charm.
Place the dough onto parchment paper and let it rest for another 30–45 minutes.
Step 4: Preheat the Dutch Oven
Place a Dutch oven or heavy baking pot into the oven while preheating to 230°C (450°F).
This step is important because the hot pot creates steam, which gives the bread that crispy artisan crust.
A cold pot won’t give the same result.
Step 5: Bake the Bread
Carefully place the dough (with parchment paper) into the hot pot.
Drizzle lightly with olive oil and top with extra rosemary or cheese if desired.
Cover with the lid and bake for 30 minutes.
Then remove the lid and bake another 10–15 minutes until deep golden brown.
Your kitchen will smell absolutely incredible at this point.
Step 6: Let It Cool Slightly
This part is honestly the hardest.
Fresh bread smells amazing, but cutting into it too early can make the inside gummy.
Let it cool for at least 20 minutes before slicing.
Warm bread with melting butter at this stage is dangerously good.
Tips & Tricks for the Best Bread
Use Fresh Rosemary if Possible
Fresh rosemary gives a stronger, more natural flavor than dried rosemary.
The aroma while baking is completely worth it.
Don’t Rush the Rise Time
Long rising time creates:
Better flavor
Airier texture
Crispier crust
Shortcuts usually lead to denser bread.
Preheat the Pot Properly
This is one of the biggest secrets to bakery-style bread.
A properly heated Dutch oven creates steam that helps the loaf rise beautifully.
Shred Your Own Cheese
Pre-shredded cheese contains anti-caking powders that don’t melt as smoothly.
Freshly shredded cheese works much better.
Common Mistakes Beginners Make
1. Adding Too Much Flour
Sticky dough can feel uncomfortable to work with, but adding too much flour makes the bread dense and dry.
Use just enough flour to handle it lightly.
2. Skipping the Long Rise
The long resting time is what develops flavor and texture.
Quick rises simply don’t create the same artisan-style result.
3. Opening the Oven Too Often
Every time you open the oven, heat escapes.
Try not to peek constantly while baking.
4. Cutting the Bread Too Soon
Fresh bread continues setting as it cools.
Slicing immediately can make the inside too soft and gummy.
Easy Variations You Can Try
Add Different Cheeses
This bread tastes amazing with:
Parmesan
Gruyère
Cheddar
Asiago
A mix of cheeses usually tastes even better.
Make It Spicier
Add chili flakes or cracked black pepper to the dough.
The spicy-cheesy combination is incredibly good.
Add Caramelized Onions
This takes the flavor to another level.
Sweet onions with rosemary and cheese taste amazing together.
What to Serve With Rosemary Cheese Bread
This bread pairs perfectly with:
Tomato soup
Pasta
Olive oil and balsamic vinegar
Roasted vegetables
Creamy soups
Charcuterie boards
Honestly though, it’s hard to beat eating it warm with salted butter.
FAQs
Do I really not need to knead the dough?
Yep.
That’s the beauty of this recipe. Time replaces kneading.
Can I make it without a Dutch oven?
Yes.
You can use any heavy oven-safe pot with a lid.
If you don’t have one, baking on a tray with a pan of hot water underneath can still help create steam.
Can I use dried rosemary?
Absolutely.
Fresh rosemary tastes brighter, but dried rosemary still works well.
Use slightly less since dried herbs are stronger.
How do I store the bread?
Store it wrapped at room temperature for about 2 days.
You can also freeze slices for later.